- 📢 Poway Auto Deployment Guide: Step-by-Step
- 📌 Step 1: Clone & Configure Project
- 📌 Step 2: Run Your Application with Docker
- 📌 Step 3: Post-Deployment Checks & Monitoring
- Deployment Diagram and Ubuntu
- 📌 Final Notes, Security Best Practices, & Reference Steps for Future Use
- Reference Steps Below
- 📌 Reference Step: Initial Setup and Accessing AWS EC2
- 📌Reference Step: Initial Server Setup
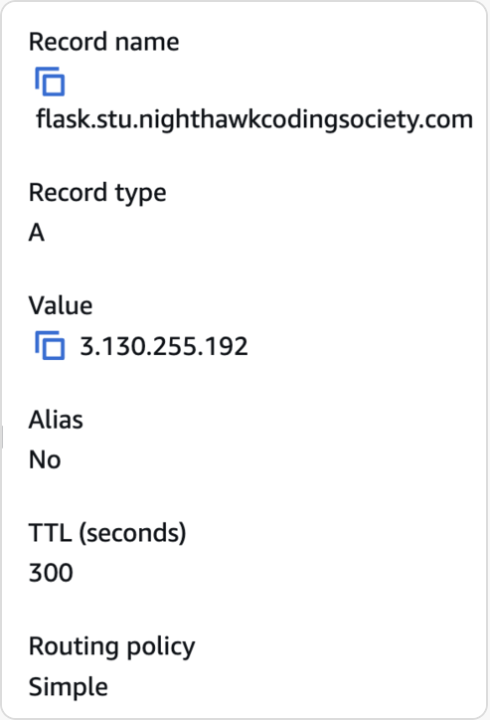
- 📌 Reference Step: Route Setup: Route53 Domain Setup (Optional)
- 📌Reference Step Expose the Application to the Internet
📢 Poway Auto Deployment Guide: Step-by-Step
Welcome to the official deployment guide for our project! 🚀 This guide provides an exhaustive step-by-step walkthrough for deploying our backend to AWS using EC2, Docker, and Cockpit. It demonstrates the exact steps we will follow in order for succesful deployment. Diagrams at the bottom, and the first three steps are the crucial ones.
📌 Step 1: Clone & Configure Project
- Clone Your Repository
git clone https://github.com/YOUR_USERNAME/YOUR_BACKEND_REPO.git my_backendExample:
git clone https://github.com/Ahaanv19/sprint4_flocker_backend.git - Navigate into the Project
cd my_backend - Create
.envFile (WE DO NOT COMMIT THIS FILE!)touch .env nano .env💡 Example
.envstructure: We will decide on a password and username just our exampleSECRET_KEY=supersecretkey DATABASE_URL=postgresql://user:password@localhost/dbname DEBUG=TruePress
CTRL + X, thenY, thenEnterto save. - Initialize Database
./scripts/db_init.py
📌 Step 2: Run Your Application with Docker
- Build Docker Image
docker-compose build - Run Docker Containers in Detached Mode
docker-compose up -d - Verify Running Containers
docker ps✅ Look for your application and its assigned port.
- Test if the Server is Running
curl localhost:8103✅ If successful, you’ll see an HTTP response from your Flask backend.
📌 Step 3: Post-Deployment Checks & Monitoring
🔹 Check Logs
docker logs -f CONTAINER_ID
🔹 Check Application Health
curl http://OUR_DOMAIN_OR_IP
🔹 Monitor Performance
Use Cockpit Backdoor for system health and logs.
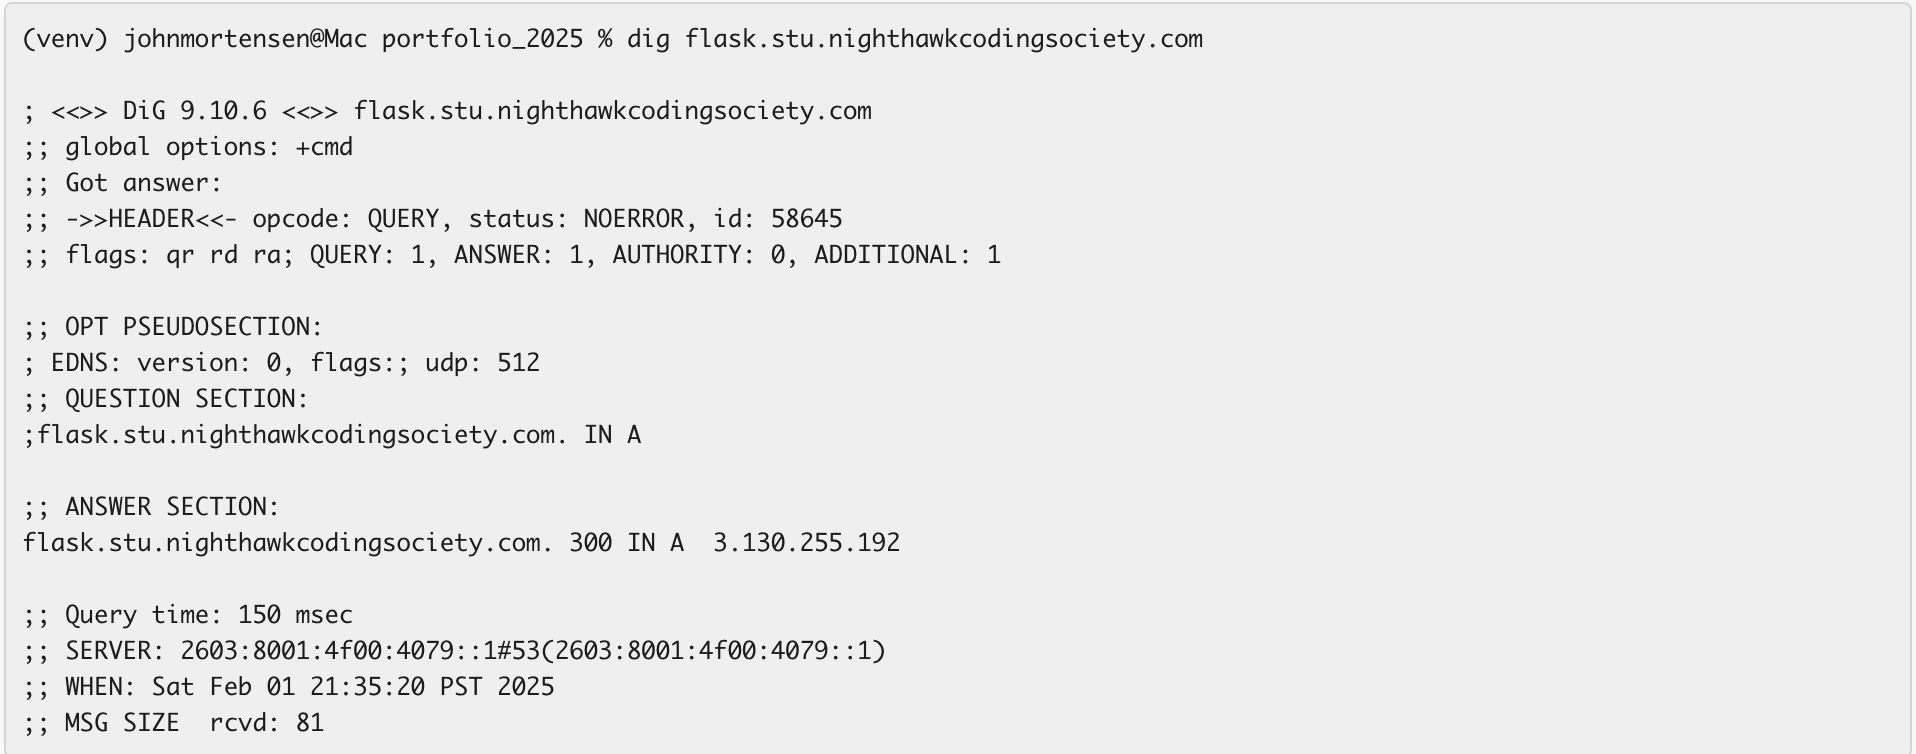
Test you DNS server
You can test in any terminal (MacOs, WSL, or AWS). Be sure it command returns IP address in answer section. Example result below
Deployment Diagram and Ubuntu

📌 Final Notes, Security Best Practices, & Reference Steps for Future Use
✅ WE DO NOT commit .env files or sensitive credentials.
✅ Regularly check logs & server health via Cockpit.
Reference Steps Below
These steps are for our reference, focus only on the steps 1,2, and 3, these steps can possibly causes issues but is still useful for future reference. DO NOT WITHOUT PERMISSION USE THESE STEPS!!!
📌 Reference Step: Initial Setup and Accessing AWS EC2
🔹 : Get Your AWS EC2 Credentials
- Access AWS EC2 Console:
- Navigate to AWS EC2 Dashboard.
- Ensuring we are using the correct AWS region (e.g.,
us-west-1).
- Locate or Create an EC2 Instance:
- If you already have an instance running, find its Public IPv4 Address under Instances.
- If you need to create a new one:
- Click Launch Instance
- Choose Ubuntu 22.04 LTS
- Select instance type:
t2.micro(free-tier eligible) - Configure key pair (download
.pemfile!) - Allow inbound traffic (ports
22,8080,443, etc.) - Click Launch
- Find Your EC2 Public IP
- Go to Instances → Your Instance → Details
- Copy Public IPv4 Address
🔹 Step 1.2: Accessing EC2 via SSH
💡 Use Cockpit for easier management: Cockpit Backdoor
Alternatively, use SSH:
ssh -i /path/to/my-key.pem ubuntu@YOUR_INSTANCE_IP
Example:
ssh -i ~/.ssh/aws_key.pem ubuntu@18.234.56.78
✅ Success Check: You should now be inside the EC2 terminal!
📌Reference Step: Initial Server Setup
- Update & Upgrade Packages
sudo apt update && sudo apt upgrade -y - Install Required Software
sudo apt install -y git docker.io docker-compose - Start & Enable Docker
sudo systemctl enable docker sudo systemctl start docker - Verify Docker Installation
docker --version✅ Expected Output:
Docker version XX.XX.XX
📌 Reference Step: Route Setup: Route53 Domain Setup (Optional)
- Go to AWS Route 53
- Register a domain name
- Create an A Record:
- Name:
@ - Type:
A - Value:
OUR_INSTANCE_IP
- Name:
This is an example, DON’T USE ANY INFO BESIDES VALUE, just use for example
📌Reference Step Expose the Application to the Internet
- Find Your Instance’s Public IP
echo $(curl -s ifconfig.me)✅ Copy the output and use it to test in a browser!
- Allow Traffic on Port 8103 (Our specfied port number)
sudo ufw allow 8103/tcp sudo ufw enable - Test Access from Your Machine
curl http://OUR_INSTANCE_IP:8103✅ Expected: Flask server response.
- Set Up Reverse Proxy (Optional, for Nginx Support)
sudo apt install nginx -y - Configure Nginx
sudo nano /etc/nginx/sites-available/my_backend💡 Example Nginx Config:
server {
 listen 80;
 server_name YOUR_DOMAIN_OR_IP;

 location / {
     proxy_pass http://localhost:8805;
     proxy_set_header Host $host;
     proxy_set_header X-Real-IP $remote_addr;
 }
}